
In today’s digital world, the Foscam cameras are becoming extremely popular and one of the best-selling security devices. The main reason behind the rapid adoption of these feature-packed security devices is their simple installation and ease of use. However, when you own this device, you need to perform the Foscam Camera Setup to make these cameras perform reliably, as intended.
So, if you are a newbie or already have this device and want assistance with setting it up, then walk through this guide right away!
Essential Tips For the Foscam IP Camera Setup!
Most importantly, when you buy any new device, it is essential to know how you can use and operate it. Generally, there are four main methods to configure and customize the Foscam camera settings as per your choice. Amongst these, two main methods are explained well with the stepwise procedure of each below:
Foscam Camera Setup on the Phone
- Initially, charge your camera sufficiently and turn it on.
- Then, link your smartphone to the available wifi network.
- Now, install the latest version of the Foscam app on your smartphone.
- Hereon, open the app and a login page appears.
- Further, log into your account using valid administrative details.
- After that, you reach the home dashboard of your security device.
- Then, from the dashboard, go to My Device Device and tap the + icon to add your device to the app.
- You can also scan the QR code using your phone camera to Add Device.
- Then, Choose the Setup Method from a wired or wireless connection.
- Further, enter a valid password to connect to the network.
- Then, place your smartphone camera closer to the Foscam and scan the QR code.
- Check the box given under the QR code and tap ‘Next’.
- After you hear ‘Wireless Connection Succeeded’, the configuration process ends.
- Now, the Foscam is added to the app.
- Then, click on the Play button to view the live feed from your camera.
- Next, your camera asks you to create a new username and password.
- Create a new username and password and tap Submit to save these changes.
- At last, the Foscam camera configuration ends.
Setting Up the Foscam Camera Via WPS Button
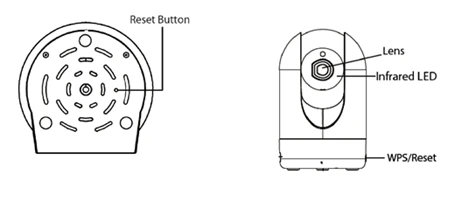
- Firstly, ensure that your camera is turned on.
- Then, locate and press the WPS button on the router to enable the WPS feature.
- Wait till the WPS LED on the camera blinks green.
- After that, release this button, and your camera attempts to connect to the router.
- Now, you see the green WPS indicator starts flashing slowly, indicating a successful wireless connection.
- Finally, the wireless Foscam Camera Setup is accomplished.
Final Thoughts
In the end, this guide summarizes the essential details of the Foscam Camera Setup through easy steps. Moreover, this guide would be a great source of information for Foscam users to configure and explore the camera settings effortlessly. If you want to learn the complete Foscam configuration process via the Equipment Search Tool or web browser, then reach out to us!